Flaky Pie Dough
- Share via
When I tell people I grew up in a family of pie bakers, it’s easy to imagine I’m bragging. My mother’s pies are legendary — rich, velvety custard fillings or mounded fruit pies, each cradled in an ornately decorated crust, golden and with the most delicate layers. And don’t get me started on my grandmother; in her day, she was known as the “Pie Baker of Villa Park,” a small suburb west of Chicago.
When I went to start baking my own pies, I didn’t think much about it. Pie-making was something my family took for granted. But then I sliced into that first homemade pie — it was pumpkin, brought to a work potluck — and found to my horror not a perfect take-for-granted pie, but a bubble of raw dough beneath the a layer of filling. There are some mistakes not even a truckload of whipped cream can cover.
A dozen or so years later, a career change, several restaurant and catering jobs and a few hundred pies later, my skills have improved — though they still don’t quite match those of my mother or grandmother. But I’ve learned a lot and continue to pick up tips. Recently, I spoke with some experts and tested more than a dozen combinations of fats, flours, ingredients and tricks. Here are my results.
CHOOSING THE RIGHT FAT
Passionate pie bakers tend to have a religious zeal about what type of fat goes into their crusts, and not without
good reason.
“Fats and shortenings are absolutely critical to pies,” says Ernest Miller, research and development chef at Coast Packing Co., a major supplier of animal fats and shortenings for cooking, baking and frying based in Vernon. The type of fat determines flavor and can influence the final texture and color of the crust. Bakers tend to use one of three kinds — butter, shortening or lard — or a combination. But which, and why?
Lard is among the most traditional of kitchen fats, once made from heritage pigs specifically bred for their fat. “In certain points in our history, lard was actually more expensive than pork,” says Miller. Never mind the cost of butter. “You wouldn’t be using butter for baking unless you were wealthy.”
Miller notes that shortening, with the introduction of Crisco in 1911, was created to mimic the effects of lard but at a fraction of the price. “An all-Crisco crust will give you the best border,” notes Beranbaum. “But I don’t use shortening, because there’s no flavor.”
As people began shunning shortening and saturated fats for health reasons, bakers looked for alternatives such as butter, even oil. Over the years, I’ve taken to making my crust using a ratio of two-thirds butter to one-third shortening. I’ve found, particularly when I keep the fats cold until the crust goes in the oven, I get some of the benefits of shortening in my detailed borders, along with the flavor of butter. (For savory pies, I’ll usually substitute shortening for lard, or even bacon, goose or duck fat, which lends great savory flavor and rich coloring to the crust.)
Although my grandmother and mother preferred shortening, they would often brush the formed crust with butter, and occasionally dust with sugar, before baking, for added flavor and color.
And lard is making a comeback. Occasionally, you can find lard from heritage pigs, such as Mangalitza, as well as from specific parts of the animal, such as leaf lard, which is valued by bakers for its delicate flavor. Coast Packing is currently testing a treated lard and tallow blend, not yet on the market, that mimics leaf lard; in my tests, I could barely tell the difference from the real thing.
A primer on pie crust fats:
BUTTER adds flavor to a crust, along with color due to the milk solids in the fat. However, over-mixing the butter can make the crust tough and crunchy.
SHORTENING has a high melting point, which will give you a light and flaky crust and allow for creative decorations, but it lacks the flavor found with butter or lard.
LARD makes a light and flaky crust. Leaf lard and rendered caul fat (another fat preferred by many bakers) have the benefits of lard with less flavor, perfect for dessert pies.
OIL results in a crust that is generally more mealy in texture, though certain fruity oils, such as olive or some nuts, will lend flavor and coloring to the crust.
FLOUR AND OTHER INGREDIENTS
Fat and its ratio to other ingredients, particularly flour, is integral to a great pie. “I think too little fat is not a pie crust,” says Los Angeles baker and pie specialist Nicole Rucker, a past winner of KCRW’s Good Food Pie Contest. “Once you remove a certain amount of fat, you’re forming more of a bread or biscuit dough.”
When it comes to flour, some experts swear by all-purpose, others by lower-protein pastry flour and still others by a host of custom blends, all in the name of making a tender but flaky crust. If she’s using all-purpose flour, Rose Levy Beranbaum, author of “The Pie and Pastry Bible,” finds that adding a touch of sugar works to tenderize the dough, mimicking the results she normally gets using pastry flour. (This is a trick she’ll be adding to her new book on baking basics, due out next year.)
Rucker also uses the sugar trick in her dough, though she goes an extra step by dissolving the sugar in water before she adds it, ensuring that it’s evenly absorbed by the flour and making for a more evenly tender crust.
Another trick is adding apple cider vinegar, which also helps to tenderize or “shorten” the crust. (You might smell it as you make and roll out the dough, but the vinegar will evaporate as the pie bakes and shouldn’t affect the taste of the crust.)
MIXING THE DOUGH
When combining the ingredients, it’s important to keep them cold — particularly your fat. If the fat, particularly butter, softens and begins to melt, the flour will absorb it, creating a tough dough. I actually take the extra step of chilling everything — fat, flour, water, vinegar — even the bowl and food processor blades.
And though some purists may argue, making pie dough in a food processor is wonderfully simple and easy. Just be sure not to over-process it; use the pulse feature and your dough will be tender as if mixed by hand.
ROLLING OUT THE DOUGH
After you’ve made the dough, flatten it into a disk, cover and chill it before you roll it out.
To keep the dough even, work the rolling pin in the center of the dough and don’t roll all the way to the edges. You’ll have greater control over the thickness of the dough if you keep the pin toward the center — the closer you get to the rim, the more likely you are to roll the pin off the edges, flattening them and making the dough uneven. Rotate the dough a quarter-turn each time you roll.
To keep the dough from sticking and absorbing too much flour, roll it between lightly floured sheets of plastic wrap or parchment or wax paper.
After you’ve formed the crust, chill it. I freeze my formed crusts for 20 to 30 minutes, which allows the crust to hold its shape and any designs while it bakes.
A note on pie dishes:
Pie dishes generally come in metal, glass or ceramic. Metal conducts heat very well, baking the crust most quickly. And a cheap metal tin is a great option if you’re bringing a pie to a gathering and don’t want to worry about getting the dish back.
If you’re new to pie baking, go for a glass dish. You’ll be able to see how the crust is baking, if there are any air bubbles and if you need to adjust the dish. If you’re really new to baking pies, find a glass dish with built-in handles so you can move the pie more easily.
Ceramic, like glass, does not conduct heat as well as metal but makes a beautiful choice if you’re presenting a pie as a gift.
BLIND-BAKING, PAR-BAKING AND FINISHING THE PIE
Blind-baking, or pre-baking, a crust is common when you’re using a filling that doesn’t need to be baked or when the crust needs to bake longer than the filling, such as with pumpkin and other custard pies. (Both flaky pie and short tart crusts need to be weighted before baking so the pastry doesn’t puff on the bottom or slip on the sides.)
To blind-bake a crust, line the chilled dough with parchment or a large coffee filter, then fill it with weights. If you don’t have store-bought ceramic or metal weights, use dried rice or beans.
Finally, watch the pie as it bakes. Most ovens heat from the bottom, so adjust the pie if necessary, moving up or down in the oven as needed. And cover the top or edges of the crust with foil if they’re browning too much.
Pie crust tips from the experts
“Know your oven. Different ovens bake differently and at different temperatures, and some oven thermometers aren’t even accurate.” — Rose Levy Beranbaum
“If you’re new to a recipe, test it first before you present it to family and friends.” — Nicole Rucker
“Have your ingredients and equipment ready before you start so you can work fast and not stumble.” — Nicole Rucker
“If you’re making a juicy pie, set it on a baking sheet before baking” in case it overflows. — Rose Levy Beranbaum
“Keep practicing. Even if it’s not perfect at first, you’ll almost always still enjoy the results, even if it’s just you with a fork and the pie in front of you.” — Diana Carter (my mom)
In a small bowl, combine the sugar with the water, stirring until the sugar is dissolved to form a simple syrup. Stir the cider vinegar in with the syrup. Cover and refrigerate until well-chilled.
To make the dough using a food processor, pulse together the flour and salt until thoroughly combined. Add the shortening and pulse until incorporated (the dough will resemble moist sand). Add the butter and pulse just until the butter is reduced to pea-sized pieces. Sprinkle the syrup over the mixture and pulse a few times until incorporated. Remove the crumbly mixture to a large bowl and very gently press or knead the mixture until it comes together to form a dough, adding additional ice water, a tablespoon at a time, if needed. Mold the dough into a disk roughly 6 inches in diameter. Cover the disk tightly with plastic wrap and refrigerate for about 1 hour.
To make the dough by hand, whisk together the flour and salt in a large bowl. Add the shortening and incorporate using a pastry cutter or fork (the dough will resemble moist sand). Cut in the butter just until it is reduced to pea-sized pieces. Sprinkle the syrup over the mixture, and stir together just until incorporated. Gently press or knead the mixture until it comes together to form a dough, adding additional ice water, a tablespoon at a time, if needed. Mold the dough into a disk roughly 6 inches in diameter. Cover the disk tightly with plastic wrap and refrigerate for about 1 hour.
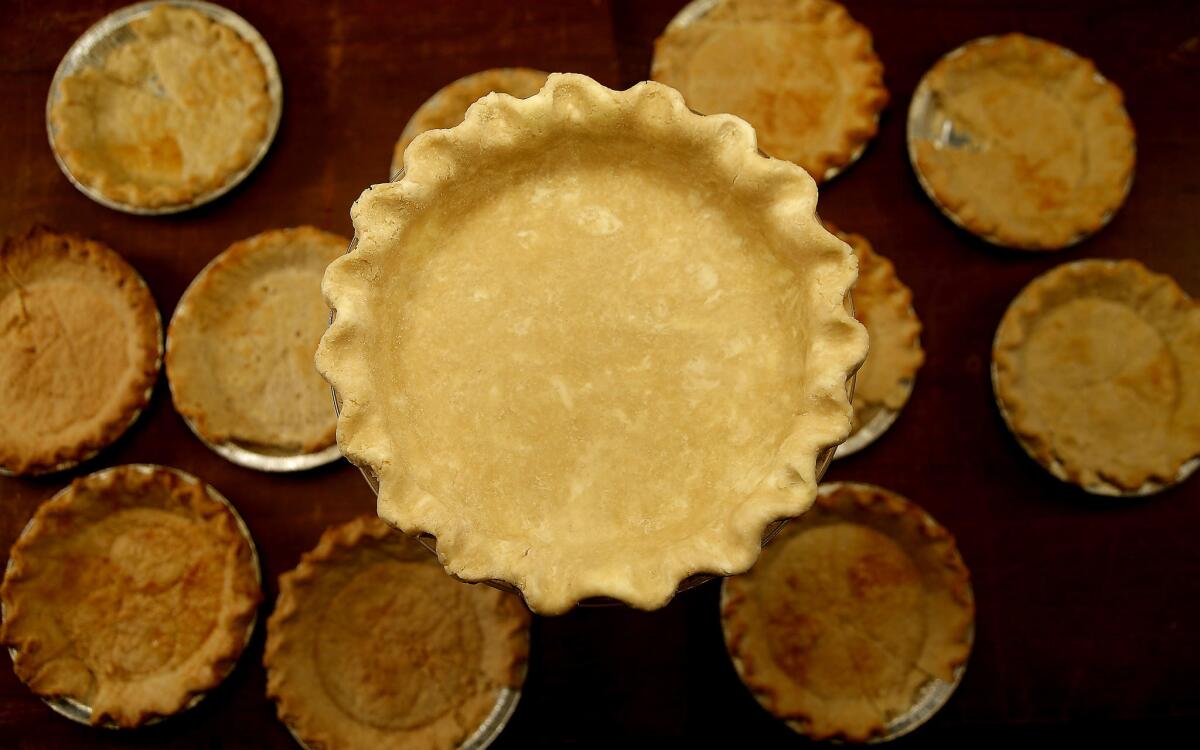
On a lightly floured surface, roll out the dough into a large round roughly 1/8-inch thick. Place in the baking dish or pan, trimming any excess that extends more than 1 inch from the sides of the dish and crimping the edges as desired. (One trick I use is to roll out the dough onto floured parchment or wax paper, invert and center the pie dish over the dough and then flip the dough into the dish.) Use any extra dough to make a decorative border (brush the edges of the unbaked crust with water or egg white before pressing any cutouts or other decorations) or save it for later use: Form the dough into a disk, cover tightly and refrigerate until needed. Freeze the formed shell for 20 to 30 minutes before filling and baking.
If par-baking (or blind-baking) the crust, line the frozen shell with parchment and fill with pie weights. Bake in a 400-degree oven for 15 to 20 minutes, then remove the weights and parchment, prick the sides and bottom a few times with a fork and bake until the crust bottom is dry and lightly colored, an additional 10 to 15 minutes (longer if fully baking the shell). To “waterproof” a par-baked crust, cool the crust for several minutes, then brush the bottom and sides of the crust with egg white before filling.
Get our Cooking newsletter.
Your roundup of inspiring recipes and kitchen tricks.
You may occasionally receive promotional content from the Los Angeles Times.


